Enigma I & II are rhythmic, percussive instruments containing thousands of samples from everyday (and some not so everyday) objects. There are lots of percussion sample libraries available but we wanted to create something different, something unique, and something that no other library currently offers. So we created Enigma.
While the sound of huge drums and thunderous hits are readily available we chose to focus on something a little different. We decided to take smaller, more intimate sounds and combine them to create a rich palette of interesting percussive rhythms. We sampled curious percussive sounds created using all kinds of objects from everyday life and built a library that allows us to use those sounds in a musical way. The original concept was to create a library of single hits but then we realised that these sounds naturally lent themselves to the creation of loops and grooves so we decided to include a system to make it easy to build loops that could be saved as pre-sets and quickly loaded into a project to add an interesting rhythmic element to any composition. We also decided to include a number of premade multis and loops to inspire your projects and show you the possibilities of Enigma. As a bonus we added easy to use EQ controls and original impulse responses from our Mirkverb collection.
Main Interface
The Enigma user interface has been designed to make use of Kontakt 4’s advanced scripting features. The controls are straightforward and easy to access, and offer lots of creative options.
The Loop Builder
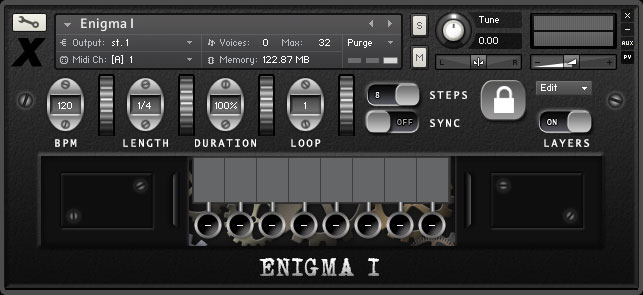 The user interface is split into two main sections which can be accessed from the edit menu. Here we’ll look at the first one this is where you will spend most of your time in Enigma, the Loop Builder. The loop builder is a simple sequencer that allows you to create a sequence from the collection of sounds in the instrument and play it back with a single key press.

The table in the middle of the interface is split into columns, each column represents a step in the sequence. The typewriter key buttons under the table (STEP keys) display which note will be played for each step. Clicking the “STEPS” button above allows you to change how many steps are in the sequence – either 8 or 16. Later in this guide we’ll see how you can assign notes to each step but first we’ll study each control on the Loop Builder interface.
BPM Wheel: Changes the loop playback rate (tempo). This control is ineffective when the “SYNC” switch is turned on. The current tempo in beats per minute is displayed next to the wheel.
LENGTH Wheel: Sets the rhythmical value of one step in standard musical note lengths. T stands for triplet.
DURATION Wheel: Sets the duration of each played step as a percentage of the current step length. For example if the LENGTH wheel is set to 1/4 and DURATION is set to 50% then the effect will be a 1/8 note playback followed by a 1/8 rest. Because many of the samples are very short you may not notice a difference in playback at high settings or at slow tempos with certain samples.
LOOP Wheel: You can have up to fifteen loops defined at any one time. This controls allos you to switch between them. You can also move this wheel up or down using the loop selector keys on the keyboard. This is detailed later in this user guide.
STEPS switch: Toggle between a loop size of 8 or 16 steps.
SYNC switch: Switches between tempo synchronised to host (on) and free tempo controlled by the BPM wheel. You only need to use this switch when you want to synchronise the Loop Builder’s tempo to that of your DAW.
LOCK switch: This switch enabled and disabled editing of the loop. To edit a loop put this switch into the unlocked position, then enter a sequence using your MIDI keyboard or Kontakt’s on-screen keyboard.
EDIT menu: This menu offers commands for copying, pasting, and resetting loops. It also has an option to go the instrument Effects panel (discussed in detail later in the guide). To copy a loop go to the loop you wish to copy, using the LOOP wheel or loop selector keys, and then select copy from the EDIT menu, next go to the loop you wish to paste to and select paste from the EDIT menu.
LAYERS switch: When this switch is in the off position it has no effect. When it is on, pressing a red key switch (see keyboard layout section below) will layer the selected sample set (patch) on top of those already selected – if you layer a lot of patches at once you may also need to increase the instrument’s voice limit to avoid dropouts (refer to the Kontakt reference manual for more information). Moving this switch to the off position will reset the stack of layered sample sets and revert to a single layer.
STEP keys (keys below the table): A loop is a sequence that is made up of a number of steps. Each of these step keys represents a step in that sequence. When in editing mode, with the lock switch in the unlocked position, you can click one of these keys to choose where to start editing your loop from. Once you have created a loop you can click on these keys to playback the note currently assigned to that step. These keys will also display the note letter that corresponds to the note assigned to them. If the assigned note is in the second playable octave of the instrument then the STEP key will have a blue background.
VELOCITY table: The table in the centre of the interface is used to enter the velocity each step in the sequence should be played back at. When editing a loop via a MIDI keyboard the velocity at which you enter notes is automatically entered for each step. You can also set the velocity manually with the mouse by dragging up or down on each column in the table. Holding down the right mouse button while dragging on the table will allow you to draw straight lines across the columns, editing multiple steps at once.
Effects Panel
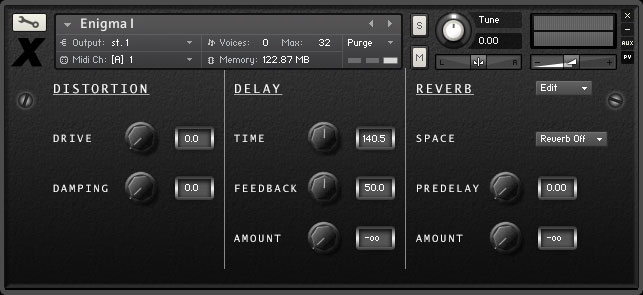
This view is accessed from the effects option in the Edit menu. To return to the Loop Builder just select Loop Builder from the same menu. The Effects Panel allows you to control the parameters of a few of Kontakt’s effects we have set up in the instrument.
Keyboard Layout

RED Keys: These keys allow you to select the different patches in the instrument. If the LAYERS switch is active then each patch you select will be stacked on top of those that are already selected, you can remove patches from the stack by pressing their key switch again. (see the LAYERS key above for more details).
BLUE Keys: These are the playable keys of the instrument and provide access to all the variations and sounds of each patch. These keys are used to enter steps into the loop builder or to play live.
GREEN Keys: These are the loop selector keys. They move the LOOP wheel up and down to let you select between the fifteen available loops.
BLACK Keys:
- C2: Toggles the LAYERS switch on the Loop Builder interface.
- C5: Use this key to enter a space step when building loops.
- C6: This is the playback key. Holding it down will playback the Loop currently selected in the Loop Builder.
Acknowledgements
Produced by: David Healey
Recording & Editing: Nick Healey & David Healey
Scripting: David Healey