The CZ-Alpha library contains 100 original patches in 4 Kontakt instruments. Each patch was created on a classic Casio CZ-101 synthesizer.
The Casio CZ-101, released in 1984, was the first phase distortion synthesizer of the CZ line and one of the first low cost programmable polyphonic synthesizers available.
With this library we captured that classic retro sound in a collection of original patches and brought them up to date by building a Kontakt instrument around them.
CZ-Alpha Installation
The folder structure of the CZ-Alpha synth download will vary depending on which version of the library you’ve purchased. It’s important to read the following information to make sure the installation goes smoothly.
Individual Instruments
When you purchase one of the individual CZ-Alpha instruments (bass & leads, pads, keys, fx) you will receive a single RAR archive that contains all the files needed for that instrument. When you extract the archive you will have a single folder containing two sub-folders called instruments and samples. If at a later date you purchase additional CZ-Alpha instruments you can combine the files in their instruments and samples folders with those from your original purchase. You should only ever need one instruments and one samples folder inside your main CZ-Alpha folder.
Complete Library
When you purchase the complete library you will receive one download containing everything you need. Simply extract the archive to the desired location on your computer and you’re ready to go.
Main Interface
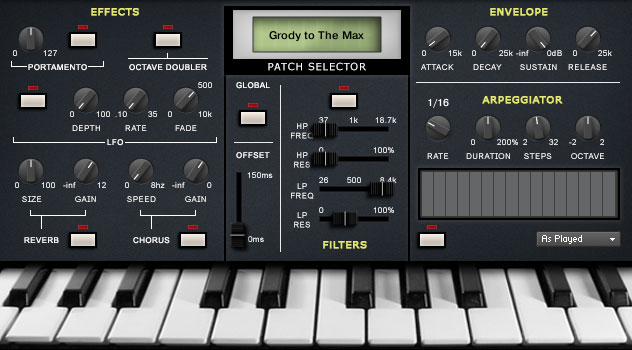
The CZ-Alpha has been designed to provide a lot of sound manipulation options with an uncluttered and easy to navigate interface. Most of the controls are self explanatory but through the rest of this guide we will look at them all in detail so that you can get the most out of the instruments.
Patch Selection

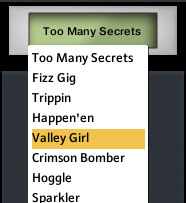 The CZ-Alpha synth library contains 100 patches categorised as bass/leads, pads, keys, and FX. Each group of patches are contained within their own Kontakt instrument and there are multiple ways to access the different patches in each instrument. The simplest way is to click inside the patch selector and choose a patch from the dropdown list.
If you’re building a MIDI sequence and would like to move to a specific patch you can use continuous controller (CC) 32. Just set the value of CC 32 to the number of the patch you want. The patches are numbered based on their order in the patch selector menu, the first patch is always number zero.
A quick way to audition the various patches is to use the two patch selection key switches, located at MIDI note C0 and C1 and highlighted in red on Kontakt’s on-screen keyboard. Pressing C0 will move to the previous patch while pressing C1 will move to the next one.
If there are any notes playing when you switch patches you may hear some artefacts as the various settings of the new patch are loaded. To preserve all of the adjustments you make to the patches you need to re-save the Kontakt instrument.
Volume Control
All of the instruments respond to the expression continuous controller (CC#11) for volume control.
Global Mode Button

By default any changes you make using the instrument’s numerous controls are only applied to the currently loaded patch and each patch retains its own settings when you move to another patch. If you want a change you make to the currently loaded patch to be applied to all of the patches in the instrument just enable the Global button (located in the central part of the interface).
Effects
The effects section of the instrument, located to the left on the user interface, provides control over several effects that ship with Kontakt and some that we have scripted. All of the effects can be disabled when you’re not using them which reduces the CPU usage of the instrument.
Each of the buttons, sliders, and knobs on the interface can be automated using Kontakt’s standard CC automation system – just right click on a control, select “Learn MIDI CC# Automation” from the pop-up, and move a hardware controller to assign the CC to that control. CC16 and CC32 are used internally by the instruments so please don’t use these for automation. To restore any knob or slider to its default value hold the ctrl key down and click on the interface control.
Portamento & Octave Doubler
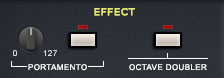
The portamento controls in this section connect behind the scenes to a modified version of Kontakt’s “Unison-Portamento” factory script. The knob on the left sets the glide time between notes from 0 to 127ms. The button enables or disables the portamento feature. As with all the buttons on the interface, when the effect is active the red light above the button will be illuminated.
When the octave doubler button is enabled every note that you play will be doubled an octave above. Usually the sample at that octave above position will be triggered however when you’re playing a note that is too high up the key range for there to be any samples above it the played note will trigger twice and the second will be pitch shifted an octave.
LFO Vibrato

The LFO section of the instrument controls Kontakt’s standard sine wave modulator. Aside from the usual on/off button this feature has three knobs.
- The depth knob controls the intensity of the effect in the range 0 – 100%.
- The rate knob sets the LFO’s frequency in the range of 0.10 – 35hz.
- The fade knob allows you to adjust the amount of fade in time before the LFO reaches the set intensity and frequency, this knob defaults to a value of 500ms.
Reverb & Chorus
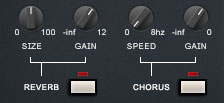
The algorithmic reverb and chorus are two standard effects that are included in Kontakt and this part of the interface provides control over some of their parameters. As with all the effects of the CZ-Alpha both the reverb and chorus can be enabled or disabled by clicking the buttons next to their names.
- The Reverb’s size knob controls the size of the simulated room created by the algorithmic reverb.
- The Reverb’s gain knob controls the intensity of the effect in the range -infinity to +12dB.
- The Chorus’ speed knob sets the frequency of the effect’s internal modulator.
- The Chorus’ gain knob sets the intensity of the effect in the range of -infinity – 0dB.
Filters
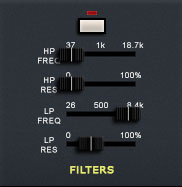
The instrument contains two filters (one high pass and one low pass) that can be enabled or disabled using the button in this section. For each filter the “freq” slider sets the filter’s cut off frequency and its “res” slider adjusts the filter’s resonance (a boost at the cut off frequency).
Sample Start Position Offset
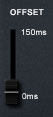
This fader can be used to offset the start position of every sample by up to 150 milliseconds. This is useful if you want to skip the attack portion of a sample.
Envelope
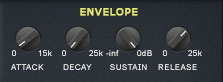
These controls allow you to adjust the settings of Kontakt’s standard ADSR envelope.
Arpeggiator
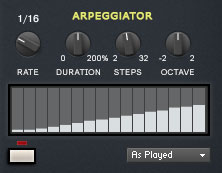
The arpeggiator in the CZ-Alpha instruments makes use of a modified version of Kontakt’s arpeggiator factory script.
- The rate knob sets the speed of the arpeggiation in standard note values.
- The duration knob controls the duration of the arpeggiated notes in percent (0-200%).
- The steps knob sets the number of arpeggiation steps the arpeggiator uses, you will see this visually in the arpeggiation table. You can use between 2 and 32 steps, the default is 16.
- The octave knob sets the octave displacement. This is the distribution of the octave pattern in the various octaves. The pattern will cycle from the played octave to that set by the knob. When playing close to the minimum or maximum ranges of the instrument this knob will have a less noticeable effect.
- The arpeggiation table is used to control the rhythm that the arpeggiator will play. Each column represents a note in the sequence and by clicking these columns and dragging up or down you can set the MIDI velocity of each note from 0-127.
- The button below the arpeggiation table is used to enable or disable the feature.
- The menu to the bottom right of the arpeggiation table allows you to select in what order the notes you play will be arpeggiated.
Acknowledgments
Produced by: David Healey & Amir Samman
Sample Recording & Editing: Amir Samman
Scripting: David Healey