Model Brass is collection of sampled solo brass virtual instruments for Kontakt 5.5 and above. Each instrument has been carefully sampled, painstakingly edited, and cleverly scripted to be highly playable and easy to use.
 We recorded the samples very dry in a controlled studio environment with closely positioned microphones. We chose close positions to minimise room noise, allowing the instruments to fit more easily into your templates and virtual environments.
We aimed to separate the room from the instrument in order give them a better dynamic response and to provide you with more flexibility and control over how you use them.
The samples have undergone very little processing since they were recorded, we’ve tweaked their tuning and adjusted their volume but otherwise they are relatively untouched. While they sound perfectly nice out of the box we built this collection with the individuality of each composer in mind and hope that you will personalise the instruments to your taste and workflow.
Main Interface
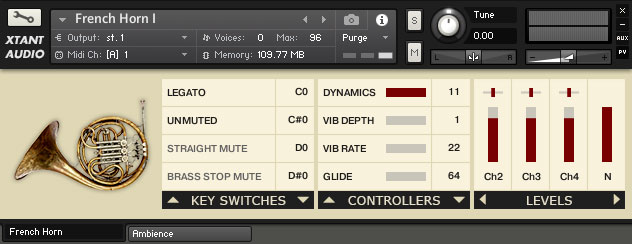
For consistency and ease of use all of the instruments in this collection use the same interface and although the specific controls vary from one instrument to the next, as the requirements of each instrument are slightly different, the basic layout and workflow is the same. The main panel is split into three sections that allow you to quickly access all of the important controls.
Key Switches
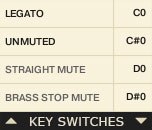
This section is set out in a grid. The right column shows the note name of the key that triggers the adjustment listed in the left column. The note names correspond to Kontakt’s keyboard with C3 being MIDI note number 60. The key switches in the Model Brass library are used to switch between different types of brass mute rather than between articulations. Below the key switch grid there are two arrow buttons, clicking the left one will scroll up through the list of available key switches while clicking the right one will scroll down.
There are two special key switches which behave a little differently to the rest:
- The Legato key switch can be activated or deactivated to toggle between legato (mono) and polyphonic mode.
- The Round Robin key switch is used to toggle the round robin feature on and off.
All of the key switches can be customised by double clicking the note name in the right column and typing in a new one. Each key switch must have a unique note assigned to it, if you enter a note that is already assigned to another key switch then the two assigned keys will be swapped.

The key switches are coloured red on Kontakt’s on-screen keyboard, except for the Round Robin on off key which is green. Active key switches are coloured black or if they are a sharp/flat key they will appear white. The blue keys show the playable range of the instrument.
You can activate a key switch either by sending the MIDI note data to Kontakt (for example by pressing the key on your MIDI keyboard) or by clicking the name of the key switch on the user interface. The text of an active key switch appears black while inactive ones show as a light grey colour. When activating a key switch (other than the Round Robin switch) via MIDI the grid will automatically scroll to display that key switch.
Continuous Controllers

The continuous controller section is laid out in a similar grid to that of the key switch section. The names of the various parameters that can be controlled are displayed in the left column alongside a red/grey slider that indicates the current level of that parameter between the standard MIDI values of 0-127. The right column shows the Continuous Controller (CC) numbers that are assigned to the controllable parameters. As with the key switches there are two arrow buttons in the black bar beneath the grid that allow you to scroll through the list of available parameters and CC assignments.
You can customise which CC number controls each parameter by double clicking on the assigned number in the right column and replacing it by typing in a new number. You can use any number between 1 and 100 and you can use the same number to control more than one parameter.
With the exception of the wah-wah all the CCs available in each of the Model Brass instruments are the same:
- Dynamics: Controls the volume and timbre of the instrument.
- Vib Depth: Sets the intensity of vibrato.
- Vib Rate: Controls the speed of the vibrato; the higher the CC value the faster the vibrato.
- Glide: This acts as an on/off switch and by default is assigned to the sustain pedal (CC64) – see the performance section below for more details.
- Buzz: Adds some high frequency buzz to the instrument, giving it a more “brassy” sound.
- Flutter: Controls a fluttering effect that can be used subtly to create a natural flutter sound or at higher intensities as a special effect.
- Growl: Controls the amount of growl sound in the instrument.
- WahWah: Only available for instruments that have a plunger, harmon, or harmon + stem mute. Used to control the classic jazzy wah-wah sound.
All of these parameters, but especially the buzz, flutter, and growl, can be used in interesting combinations to create a wide variety of natural performance techniques or artificial tonal effects.
Microphone Levels
This section gives you control over the volume and pan settings of each set of samples in the instrument. Every Model Brass instrument was recorded with three or four microphones in a close position, for the cleanest sound you’ll probably only want to use one or two together at a time.
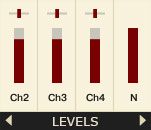
The microphone level controls are arranged in the style of simple channel strips; the horizontal slider at the top is used to control the microphone’s pan position and the vertical slider is used to control its volume. You can assign a CC to these controls by right clicking on them and selecting “Learn MIDI CC# Automation” from the pop up and then moving a hardware controller.
![]() Having multiple microphone sample sets increases the number of voices used by Kontakt and when you have several instruments loaded this can use a lot of processing power. To reduce the burden on your CPU you can unload samples that you are not using by clicking on the channel name beneath the volume slider (Ch1, Ch2, etc.). When a microphone is unloaded the channel name will be greyed out and the volume slider will be set to 0, to reload the samples you just have to click the channel name again. Hovering the mouse over the channel name will display the type of microphone used in Kontakt’s info pane at the bottom of the Kontakt window.
Having multiple microphone sample sets increases the number of voices used by Kontakt and when you have several instruments loaded this can use a lot of processing power. To reduce the burden on your CPU you can unload samples that you are not using by clicking on the channel name beneath the volume slider (Ch1, Ch2, etc.). When a microphone is unloaded the channel name will be greyed out and the volume slider will be set to 0, to reload the samples you just have to click the channel name again. Hovering the mouse over the channel name will display the type of microphone used in Kontakt’s info pane at the bottom of the Kontakt window.
All musical instruments produce noise when they are played; such as key clicks, bow noise or, in the case of wind instruments, tube noise which tends to be heard as a high pitched hiss. The amount of noise that we hear depends on the proximity and direction of the microphone to the instrument and the intensity with which the musician is playing. To reduce the noise we move the microphone further away or adjust its axis.
All of our microphones were positioned in a close setting in order to capture a dryer sound. This means we captured a reasonable amount of performance noise in each microphone and when the samples from the different microphones are played together the noise is multiplied. To combat this we carefully separated out the noise component of each sample from which we created individual noise samples that we then placed back into the instrument.
To control the noise samples we have included a dedicated channel in the Levels section marked “N”. There is no pan setting for this channel because the panning for the noise samples of each microphone channel is controlled by that channel’s pan slider. The noise channel’s volume slider controls the level of noise across all of the microphones; when you adjust an individual microphone’s volume level you will also be adjusting its noise level in proportion to the noise level slider. Doing this allows you to adjust the amount of instrument noise you hear and helps when positioning the instrument in a virtual environment.
You can unload all of the noise samples at any time by clicking the N beneath the noise level slider. As there is one noise sample for every normal sample unloading them reduces the voice count and RAM usage of the instrument by 50%.
Generally if you want a wetter or more distant sound it will be better to decrease the amount of instrument noise and increasing it is more suitable for a closer, more intimate feel. You may find that having only one or two of the microphones active helps to sit the instrument more pleasingly in your virtual environment and using the individual microphone pan controls you can position the instruments horizontally in the sound field and increase their stereo presence.
Ambience
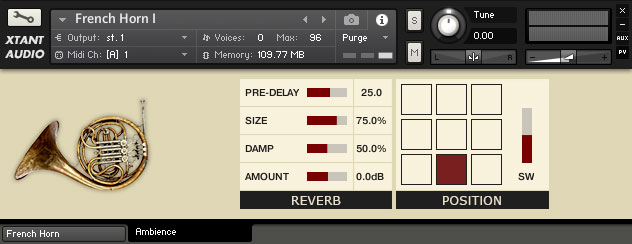
Below the main interface are two tabs that allow you to switch between the instrument’s main controls and the ambience controls. The ambience tab provides an interface to control the reverb and spacial effects of each instrument.
Reverb
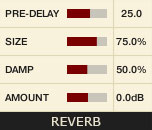
Kontakt ships with a good algorithmic reverb effect which is included in all of the Model Brass instruments. The controls are laid out in a table; each red/grey slider can be used to adjust the parameter listed in the left column and the value of that parameter will be displayed in the right column (pre-delay is in milliseconds). You can apply CC automation to these sliders by right clicking on them and selecting “Learn MIDI CC# Automation” from the pop up and then moving a hardware controller.
When using several of the instruments at the same time it is more efficient to disable this effect and to use a single reverb, either in Kontakt’s mixer or in your DAW, that you can route multiple instruments to. You can quickly disable the Model Brass reverb by clicking the “REVERB” text in the black bar at the bottom of the reverb section. You can click it again to re-enable it.
Position
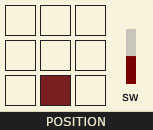
The position grid can be used to place the instrument within the virtual sound stage by clicking on one of its nine squares. The higher up the square the farther away the instrument will sound, clicking a square to the left or right will move the instrument in that direction. In the default position (displayed in the image above) the instrument is as it was recorded without applying any positioning effect.
The slider to the right of the position grid (marked SW) is used to set the stereo width of the instrument, the default position in the centre has no effect on the instrument. The higher the value the farther apart the left and right channels will appear to be.
As with the reverb effect you may want to disable the positioning system to save computer resources, you can do this by clicking the “POSITION” text in the black bar at the bottom of this section.
Performance
You may be wondering where all the key switched articulations are that you are familiar with in other sample libraries. Well, there are none here. The goal of the Model Brass sample library is to provide something a little different to what’s already available. We wanted to create a set of instruments that you can perform in a natural and pianistic way using just a keyboard and a few continuous controllers.
Long Notes
To sustain a note just hold down a key – all of the long samples will loop indefinitely. We attempted to find the smoothest loop points we could and although we’re sure some keen ears will be able to detect them in a solo context they should be well hidden in an ensemble piece.
You should use the dynamics continuous controller to create swells, crescendos, diminuendos and any other expressive dynamic changes you like, a breath controller is perfect for this.
Legato
To play legato you must first put the instrument into Legato mode (see key switches section above), then you just need to play in an overlapped style, playing the next note before releasing the previous one. This might take a little bit of practice (or piano roll editing) but should feel quite natural. The Model Brass legato transitions are algorithmic and accurately modelled to how a real instrument produces its legato sound.
You don’t need to worry about pacing your playing to get a smooth interval, the instrument will detect your playing speed, the pressure you’re using on the keys (velocity), and a few other parameters to calculate a realistic transition.
A sustain pedal (or any other controller assigned to the Glide CC) can be used to trigger a same note legato transition. When the sustain pedal is active (CC above 64) any note played will sound continuously until the sustain pedal is released (CC below 64); if you play the same note again while the pedal is active and the first note is still sounding it will trigger a quick legato transition between the two notes.
Glides
When the instrument is in Legato mode (see key switches section above) and the Glide CC is active (CC value above 64) playing two overlapping notes will trigger a glissando/portamento style glide between the two notes. The velocity at which the second note is played determines the speed of the glide, a lower velocity will result in a slower glide.
As with the legato transitions the Model Brass library uses an algorithmically modelled system to produce natural and formant accurate glides between notes; it does this by making use of all the samples inbetween the two notes that triggered the glide. The character of the glide varies between instruments as does the maximum glide range (the trombones have the smoothest and longest glides). With some of the instruments (especially the tubas) it is possible to play glides that are not playable on the real instrument but that you may find useful.
Trills
To make it easier to play trills we have included a retrigger feature, this feature only works when the instrument is in Legato mode (see key switches section above). Press a key and while still holding that key down play another key and then release it, this will retrigger the first note with a smooth transition inbetween – just repeat the procedure to play a trill of any duration, tempo, and interval that you would like. This retrigger function also works when performing glides.
Short notes
To play a short note just think like a pianist, release the key earlier and the note will be shorter.
Accents
Play with a higher velocity to increase the attack of the note. With legato transitions this will affect the sound of the transition, which varies subtly between the different instruments. Playing very softly will add a slight fade in to the beginning of non-legato notes.
Pitch Wheel
We’ve discussed the other controllers the instruments use earlier in this guide but the ability to bend the pitch of notes is an important part of certain styles of brass music and the pitch controller is the natural choice for performing such techniques. The pitch bend wheel works beautifully with the Model Brass instruments to create subtle bends in to, out of, and between notes. Give it a try with the harmon or plunger mutes active or combine it with the WahWah controller for some really nice jazzy sounds.
Mutes
One of the key aims of the Model Brass instruments is that they are versatile and able to adapt to different types of music easily. To achieve this we believe it is imperative that they offer a good selection of mutes. The choice of mutes varies between the different instruments (see table below) but they all have at least one that can be activated by a key switch. Some of the mutes – plunger, harmon, harmon + stem – can be used in combination with the Wah-Wah controller.
Acknowledgements
Produced by: David Healey
Recording Technician: Sarah McNeill
Sample Editing: Sarah McNeill, Melissa Pons, Lorenzo Castellarin
Help & Advice: Elan Hickler, Jesus Ginard, Raymond Radet
Scripting: David Healey
Web Graphics: Koke Núñez Gómez
Musicans: Heather Armstrong, Alexander Wylie, Joseph Erskine, Richard Brooks, Bethany Atkinson, Helen Kuby, Thomas Jackson, Robert Vaughan